Here we are, 25 days away from Thanksgiving — a time when we are usually beginning to plan the menu for the big day. Some people start to stockpile ingredients and even make some dishes early and put them in the freezer.
But this year is different.
Some families have already decided that they are going ahead as usual, even with cases of covid on the rise. Others have decided to cancel the big extended-family gathering. And stll other families are putting the decision off until closer to the holiday.
Whatever your family decides, Thanksgiving will look different for everyone this year.
How are you adapting to a holiday in the pandemic?
This has always been one of my favorite cakes and is a perfect fit for a fake gourmet. 🙂
Start with a German chocolate cake mix, preferably the kind with pudding in the mix. Follow the directions on the box to prepare the mix. (I like to substitute sour cream for the oil called for on the box because it gives a nicer texture.)
Once the batter is ready, pour half of it into a greased and floured 9×13 cake pan. I line the bottom with parchment before greasing and flouring, but it isn’t required. Bake at 350 degrees for 10 minutes; then remove it from the oven and let it cool for 10 minutes.
While the first half is baking and cooling, unwrap a 14 oz. bag of caramels and put them in a small saucepan with 1/3 cup of milk and a stick of butter (1/2 cup). Heat over low until the caramels melt, stirring constantly to keep it from sticking. (You can also do this in the microwave, in 1 minute intervals, stirring after each interval.)
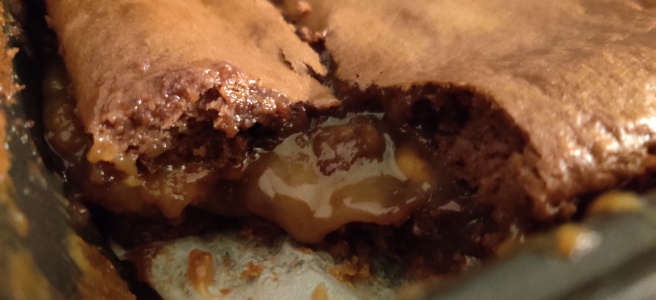
You can add as thick a layer of chips and nuts as you like!
Once the caramel mixutre is smooth, pour it over the baked cake and sprinkle milk chocolate chips and dry roasted peanuts evenly over it. Top with the rest of the cake batter. Spread it gently to completely cover the layer of caramel, chips, and nuts. (Be sure to pour the batter as evenly over the top as possible; it is difficult to spread without distrurbing the chips/nuts.)
Return to the oven and bake for an additional 20-25 minutes or until the top of the cake springs back when you touch it lightly.
Now for the hardest part . . . DON’T CUT IT UNTIL IT IS COMPLETELY COOLED! If you cut it too soon, you will end up with a mass of chocolate, caramel, and nuts that is almost a pudding. It still tastes wonderful, but it is much messier to eat. Allowing it to cool completely (at least 2 hours!) will let the caramel layer set.
Leftovers can be stored in a covered dish until gone — no need to refrigerate!
Yes, I realize that to most people, temperatures in the 70s don’t qualify as cool weather. But to those of us accustomed to the sweltering heat of an Alabama summer, 70s in the daytime signals fall is on the way!
For the past week, I’ve been taking care of two different family members in two different hospitals (no covid, thank goodness!), plus the temperatures are telling us to get ready for fall, so we were all ready for some comfort food. I have potato soup in the crock pot, and earlier today I made rice pudding from the leftover rice in my fridge.
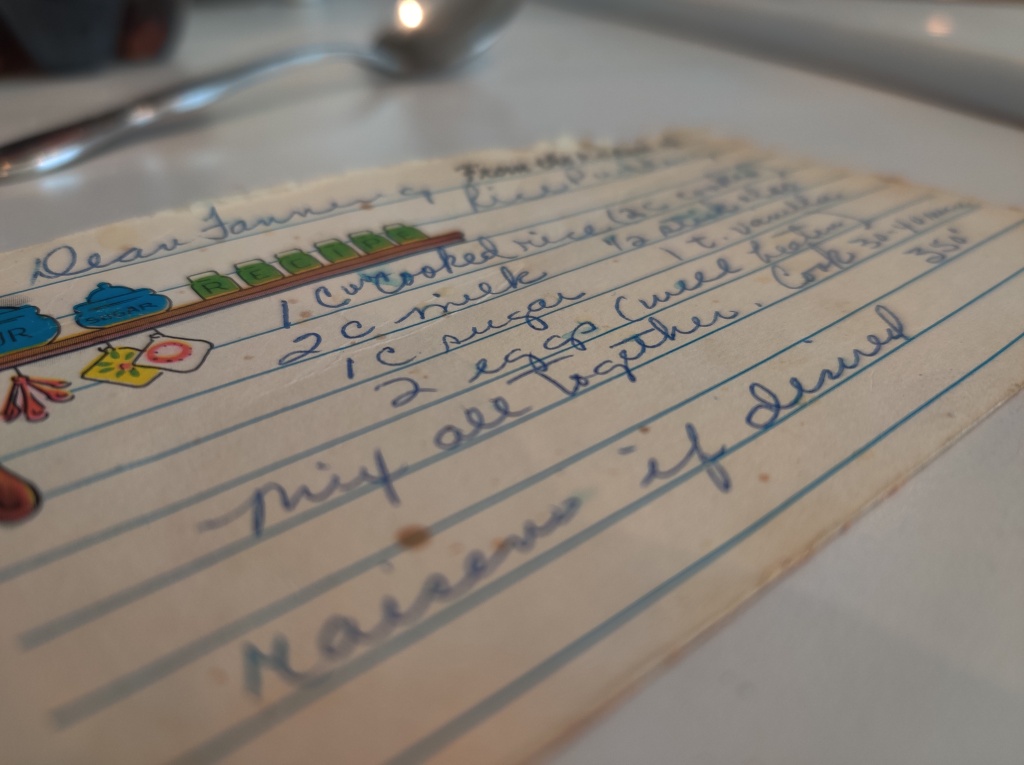
That is the first important thing to know about making rice pudding — always use leftover rice. If you make rice fresh for the pudding, it won’t absorb enough liquid and you’ll end up with something closer to rice soup!
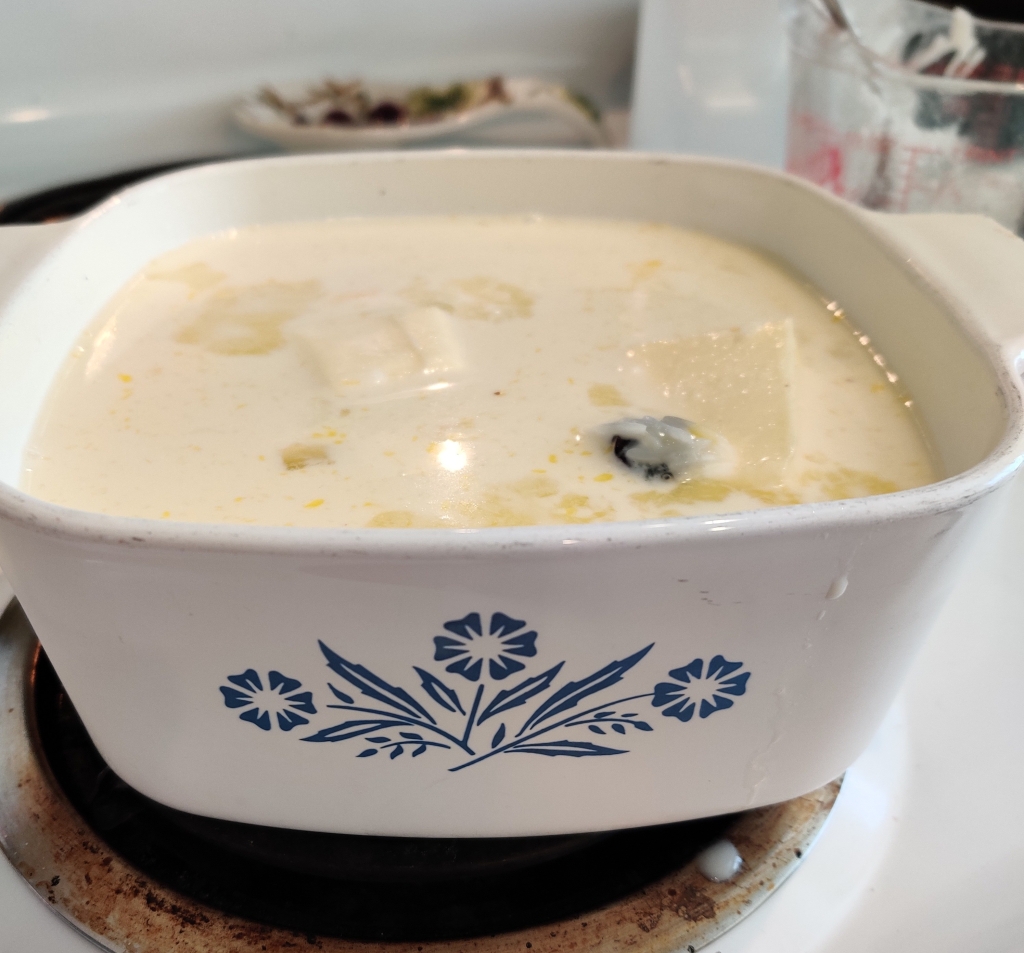
The rice pudding mixture before cooking. My mom used this same casserole dish for rice pudding my whole life!
This is my mom’s recipe that she got from a friend many years ago. It’s super easy and can be made in one dish, so it doesn’t make a mess.
Put 2 cups of leftover cooked rice and 2 cups of milk in an oven-safe casserole dish. Add 2 beaten eggs, 1 cup of sugar, and 1 teaspoon of vanilla. Stir it all until it is well-mixed. Add 4 tablespoons of butter. Add raisins or dates if you like. (I usually add two snack-sized boxes of raisins, but the amount really depends on how much you like raisins!)
Bake at 350 degrees for 35-45 minutes. It’s done when it is starting to brown on top and the custard looks like it is starting to set.
The finished dish
This recipe only takes about 5 minutes to put together and is delicious! It is also easy to double for a large group, or to cut it in half if you only need enough for a couple of people. Leftovers can be covered and stored in the refrigerator for several days — if it lasts that long!
I am a cornbread purist. I don’t want bits of things in it. No corn kernels. No broccoli. No onions. Just cornbread.
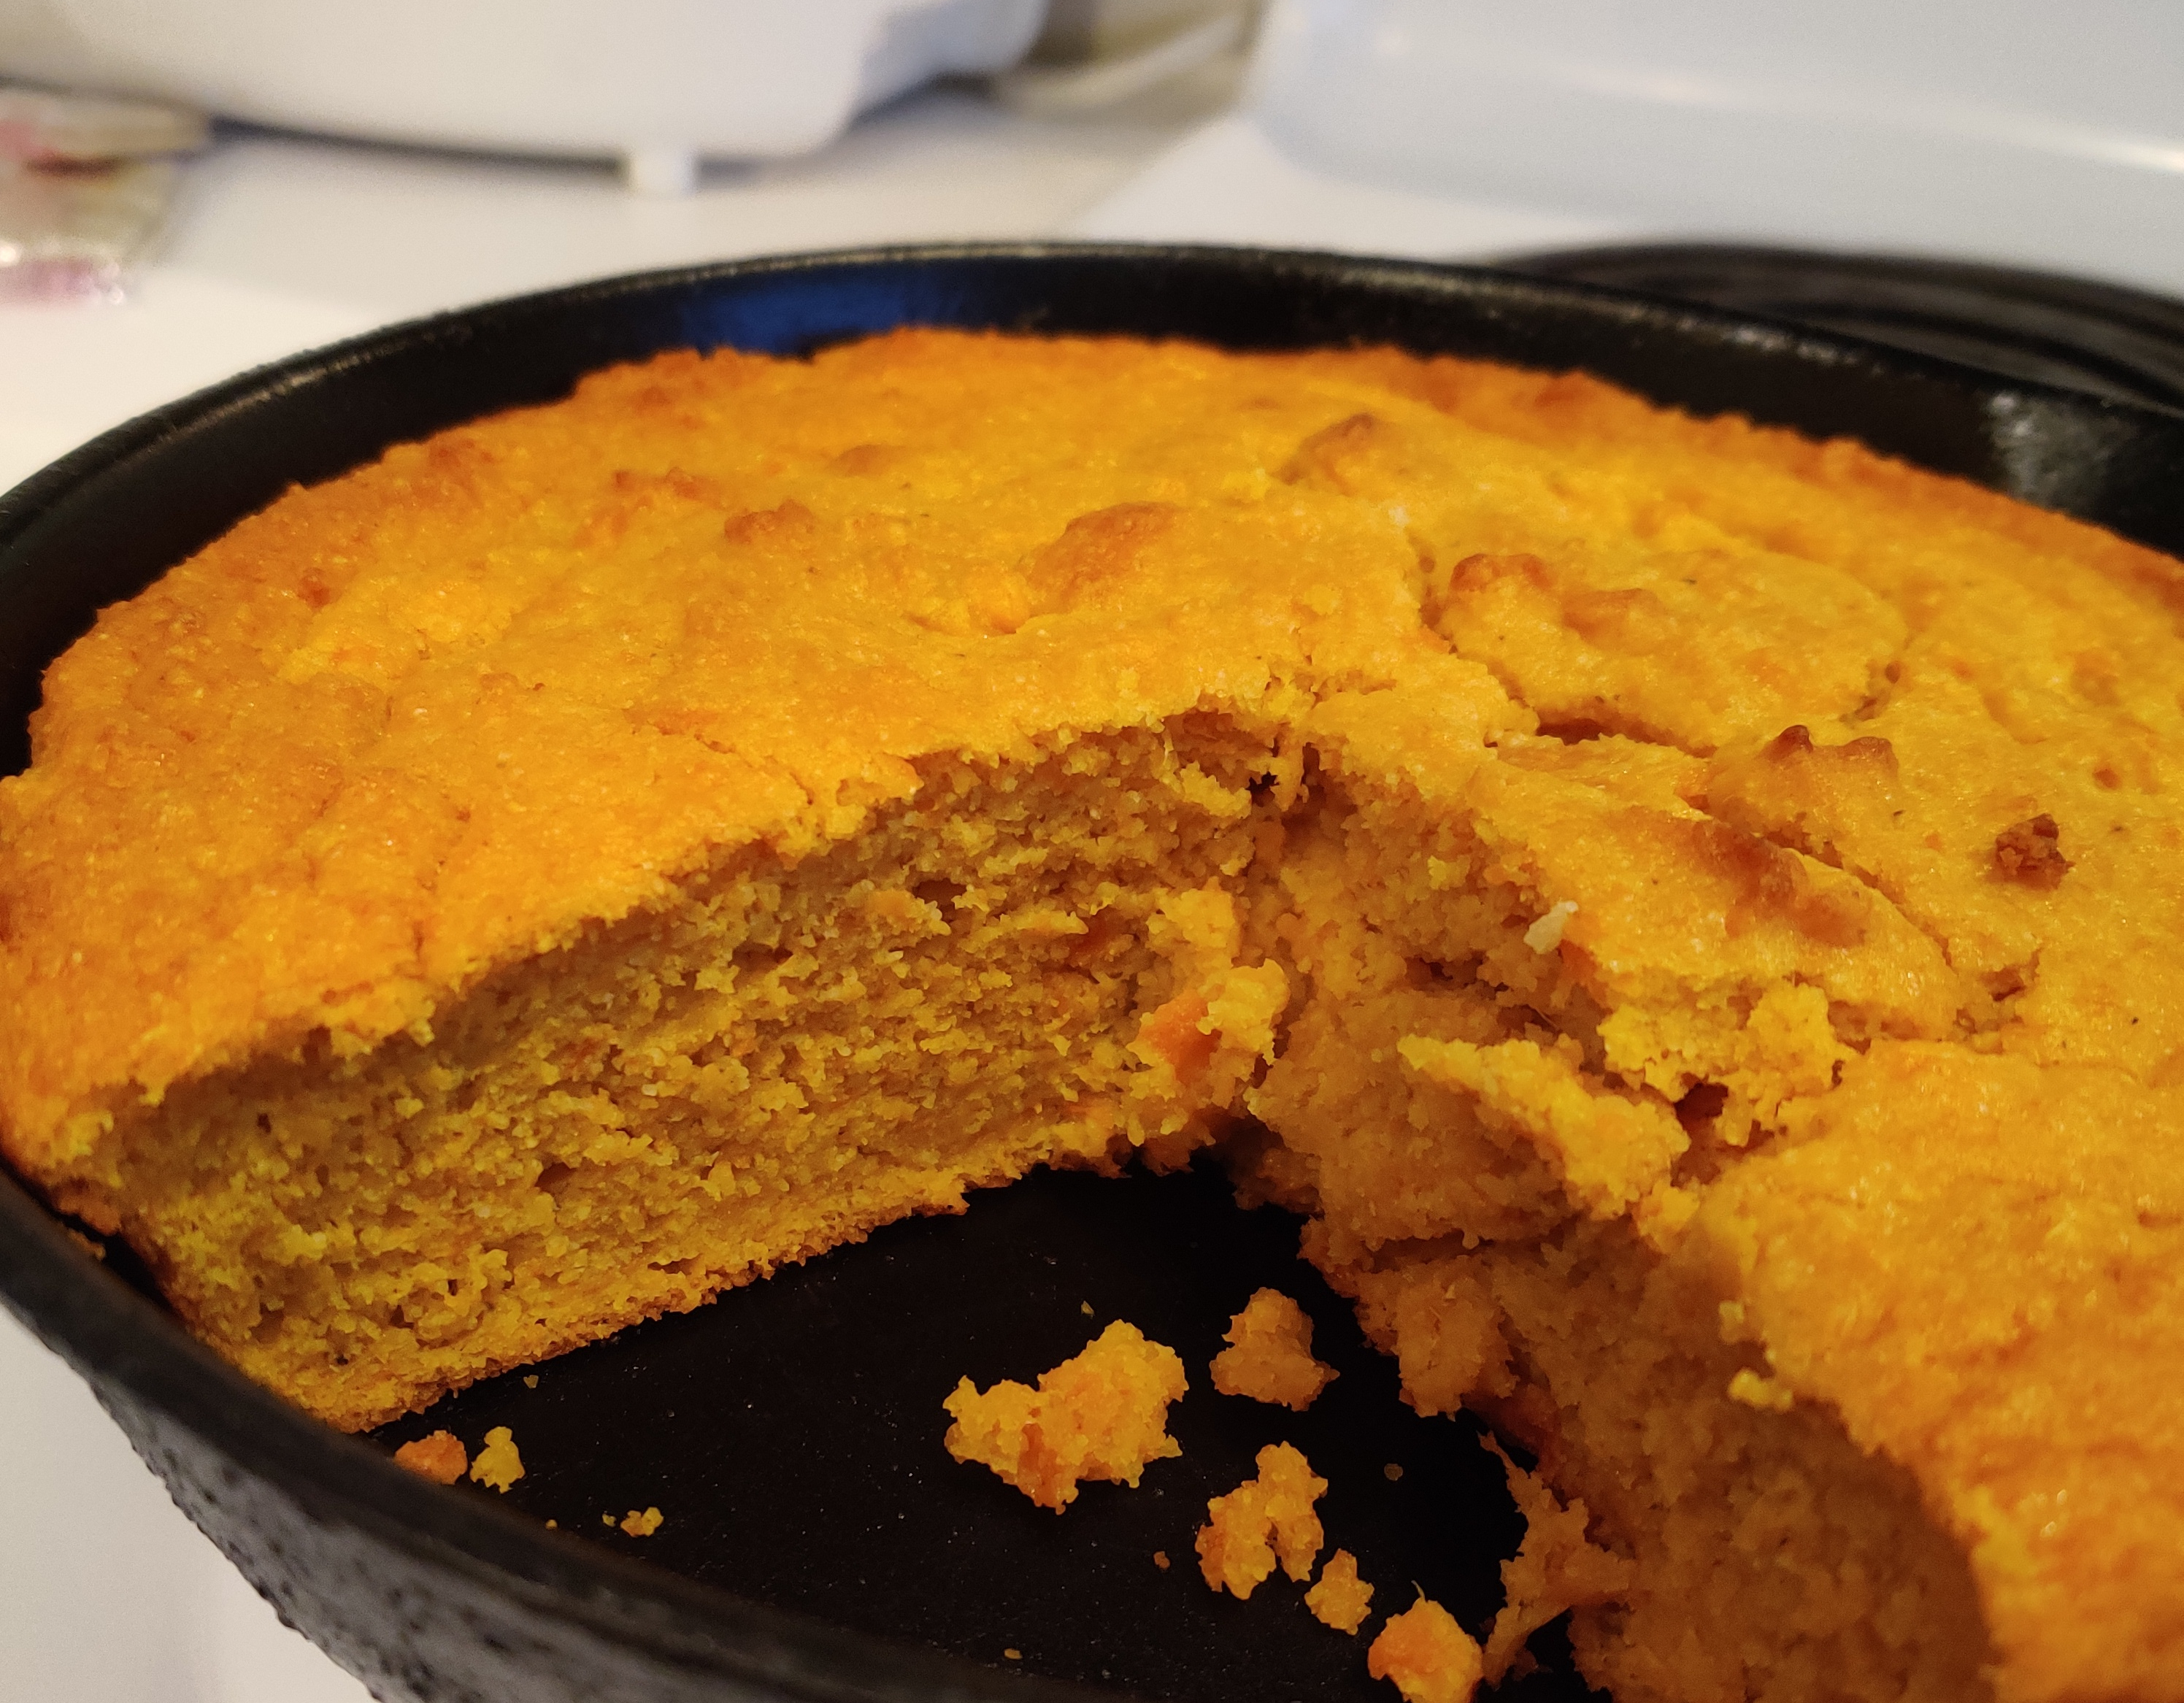
Sweet potato yumminess! Perfect with soup or comfort food. Or just all by itself!
But then I saw something interesting on Facebook — sweet potato cornbread. Hmmm. No bit or chunks. Just cornbread made using sweet potato puree. I thought that might be worth trying.
Boy, am I glad I did!
I ended up with a very moist, almost cake-like cornbread that was wonderful with butter and also with jelly (apple butter was particularly good!).
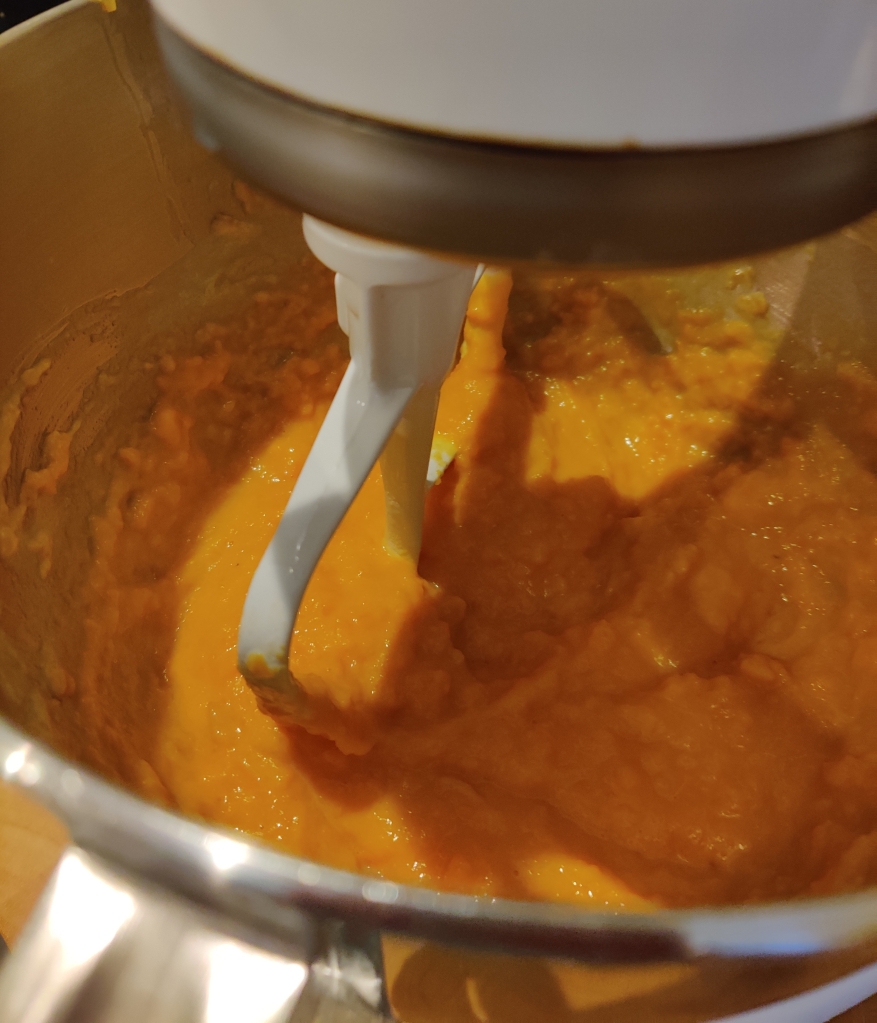
Start by boiling 2 medium sized sweet potatoes. You can peel and cut the sweet potatoes into pieces before boiling, or you can boil them with the skins on and slip them off easily after boiling. Since sweet potatoes are very hard and irregularly shaped, they can be difficult to peel and cut up when they are raw. (Meaning it’s much easier to cut or injure yourself when trying to cut them up. Not that I know from experience.) If you boil them with the skins on, be sure to pierce the skin with a fork after boiling for about 10 minutes to help speed the process. Boil for another 20-30 minutes, until a knife will slide into the potato easily with no resistance. Run cold water over the potatoes until they are cool enough to handle, then slit the skin and peel it off. (It’s kind of like peeling a banana.)
The sweet potato mixture after adding the wet ingredients
Once you have prepared the sweet potatoes, mash them in a bowl with 3/4 cup of buttermilk. The buttermilk will help cool the temperature of the sweet potatoes. I recommend using an electric mixer to get a smooth texture, but you can also mix by hand. Once it is well mixed and cooled, add 2 large eggs and mix well. It is important for the sweet potato mixture to be cooled before adding the eggs, to prevent the whites from starting to cook and ruining the texture.
In a food processor, combine 1 cup + 2 1/2 tablespoons of cornmeal, 1/2 teaspoon of ground ginger, 1/4 teaspoon of baking soda, 1/4 cup of sugar, and 1/2 cup of plain flour.
*If you are not using self-rising cornmeal, also add 3/4 teaspoon salt and 1 1/2 teaspoon of baking powder. If you are using self-rising, those ingredients are already included.
After you have combined those ingredients, add one stick (1/2 cup) of cold butter that has been cut into small pieces and process until the mixture is the texture of coarse sand. Add to the sweet potato mixture and stir until just combined.
Pour the mixture into a black skillet* and bake at 350 degrees for about 40 minutes, or until firm and lightly browned. Remove from the oven and let it cool for 10 minutes before slicing.
*A well-seasoned black skillet is always the best choice for baking cornbread, but a stone baking dish also works well.
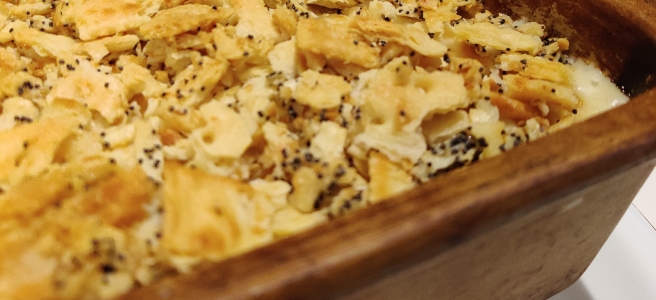
I’m not sure when my mom started making Poppyseed Chicken casserole, but I know I’m glad she did. It was always a dish we loved to request for birthday dinners, cool nights, or company dinners. It’s so easy to make (and easy to make a lot) if you are cooking for a large group.
You can prepare the chicken a couple of different ways. The original recipe says to boil 8 chicken breasts. (Keep in mind that this recipe dates back to when a single chicken breast wasn’t the size of my head. By today’s standards, you probably need 4-5.) The easier way is to buy a pre-cooked rotisserie chicken from the deli counter at your local supermarket. They are usually all about the same size, but get the largest one to be safe.
This is the consistency you should have for the chicken mixture before baking. If it is too runny, add more chicken. If it is too thick, add extra sour cream.
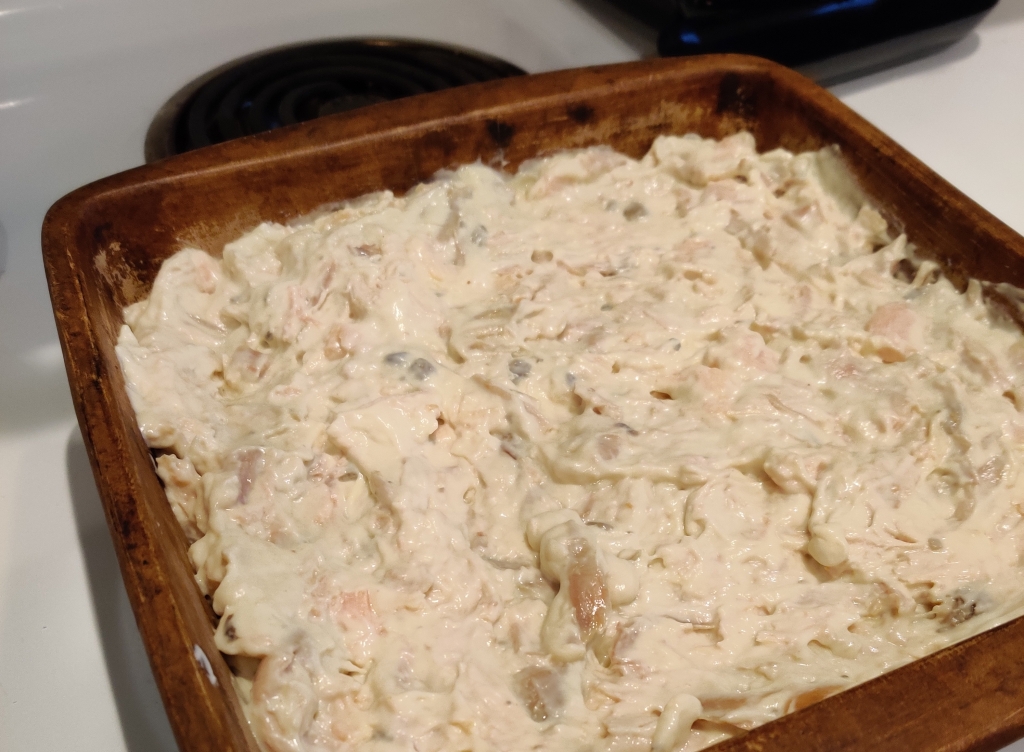
When you get it home, remove all the meat from the bones, discarding the skin. Tear or cut the meat into bite sized chunks. Add 1 cup (8 oz.) of sour cream, one can of cream of chicken soup, and one can of cream of mushroom soup. Stir it all together. The mixture should be thick, not runny. If it seems to be runny, add more chicken. (You can add a large can of white meat chicken, or a another cooked chicken breast.)
Put the mixture in a 8×8 or 9×9 casserole dish.
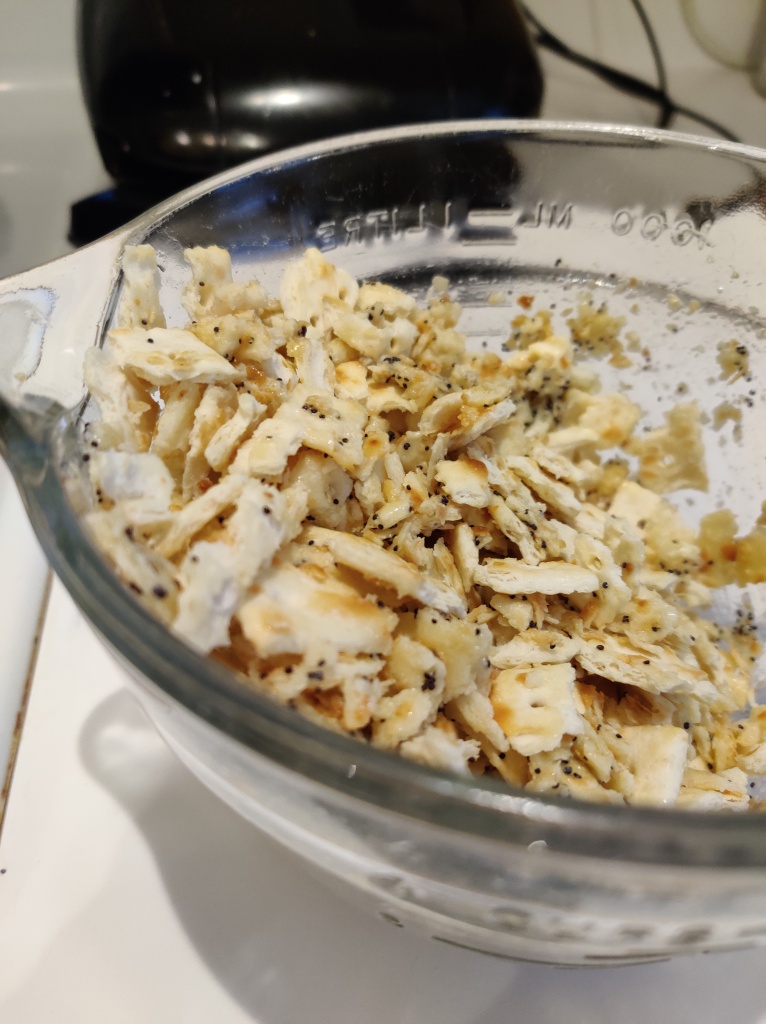
Cracker topping
Melt one stick of butter (1/2 c.) and stir in 2 T. of poppyseeds. Crush one sleeve of saltine crackers into medium sized pieces and add to the butter. Stir well to coat the crackers and then spread them evenly over the top of the chicken mixture. (The original recipe also calls for 1/3 c. slivered almonds in the topping, but so many people are allergic to nuts, I usually leave them out.)
Bake at 350 degrees until bubbly (about 20-30 minutes). Let it cool for 10-15 minutes before serving. Keep any leftovers covered in the refrigerator and reheat as desired.
If you need to serve a crowd, use two rotisserie chickens or 6-8 chicken breasts, an extra can of soup (whichever flavor you prefer), and double the amount of cracker topping. Put in a 9×13 dish.
The great thing about this casserole is that it freezes well! Keep a dish of it in the freezer and you have a quick meal if needed.
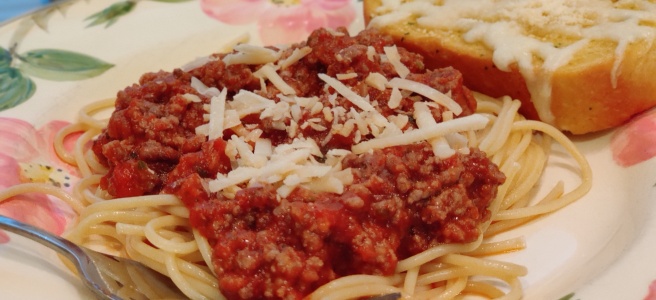
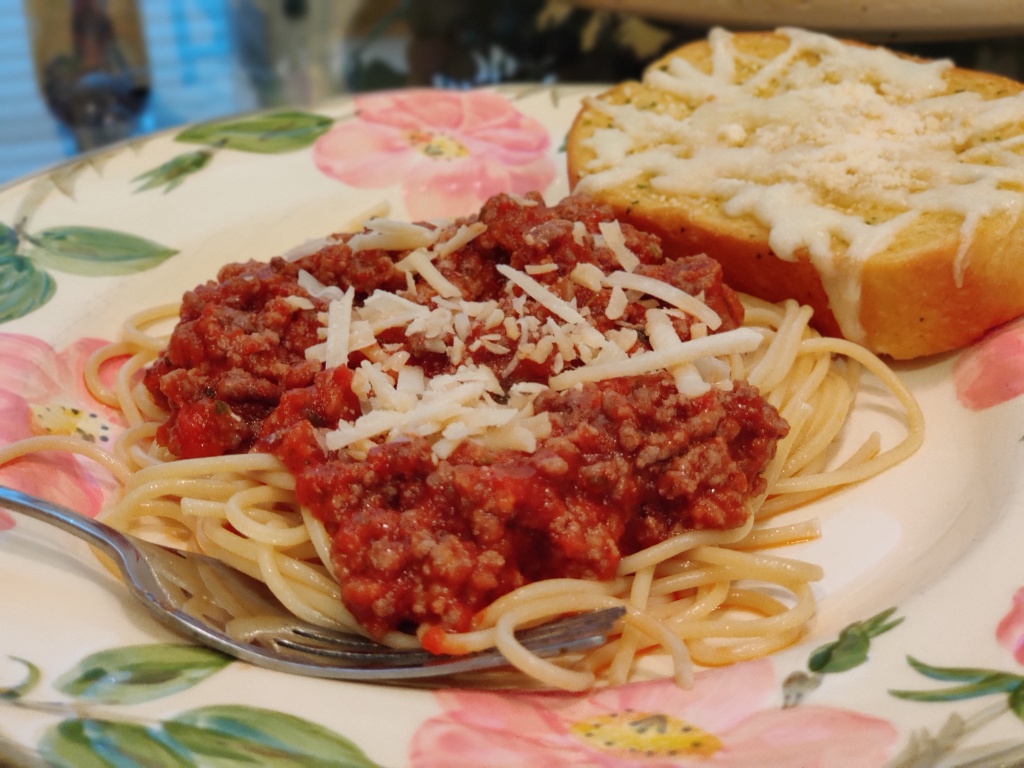
Continuing to work on the new edition of my cookbook!
This weekend I made spaghetti and cheesy garlic bread so I could take pictures to add to the recipe. Now I’m off to decide what NEW recipe to make this week to add to this blog. What would you like to see? Drop a suggestion in the comments!
Today is Labor Day, so of course I’m thinking about food. Well, I’m also thinking about time on the water, but I’m also thinking about what food we’ll be eating while we’re there.
This year will be different because of the restrictions related to the pandemic. Instead of twenty people, there will probably be six. Instead of making five or six dishes, I’m making two. And we’ll enjoy every bite!
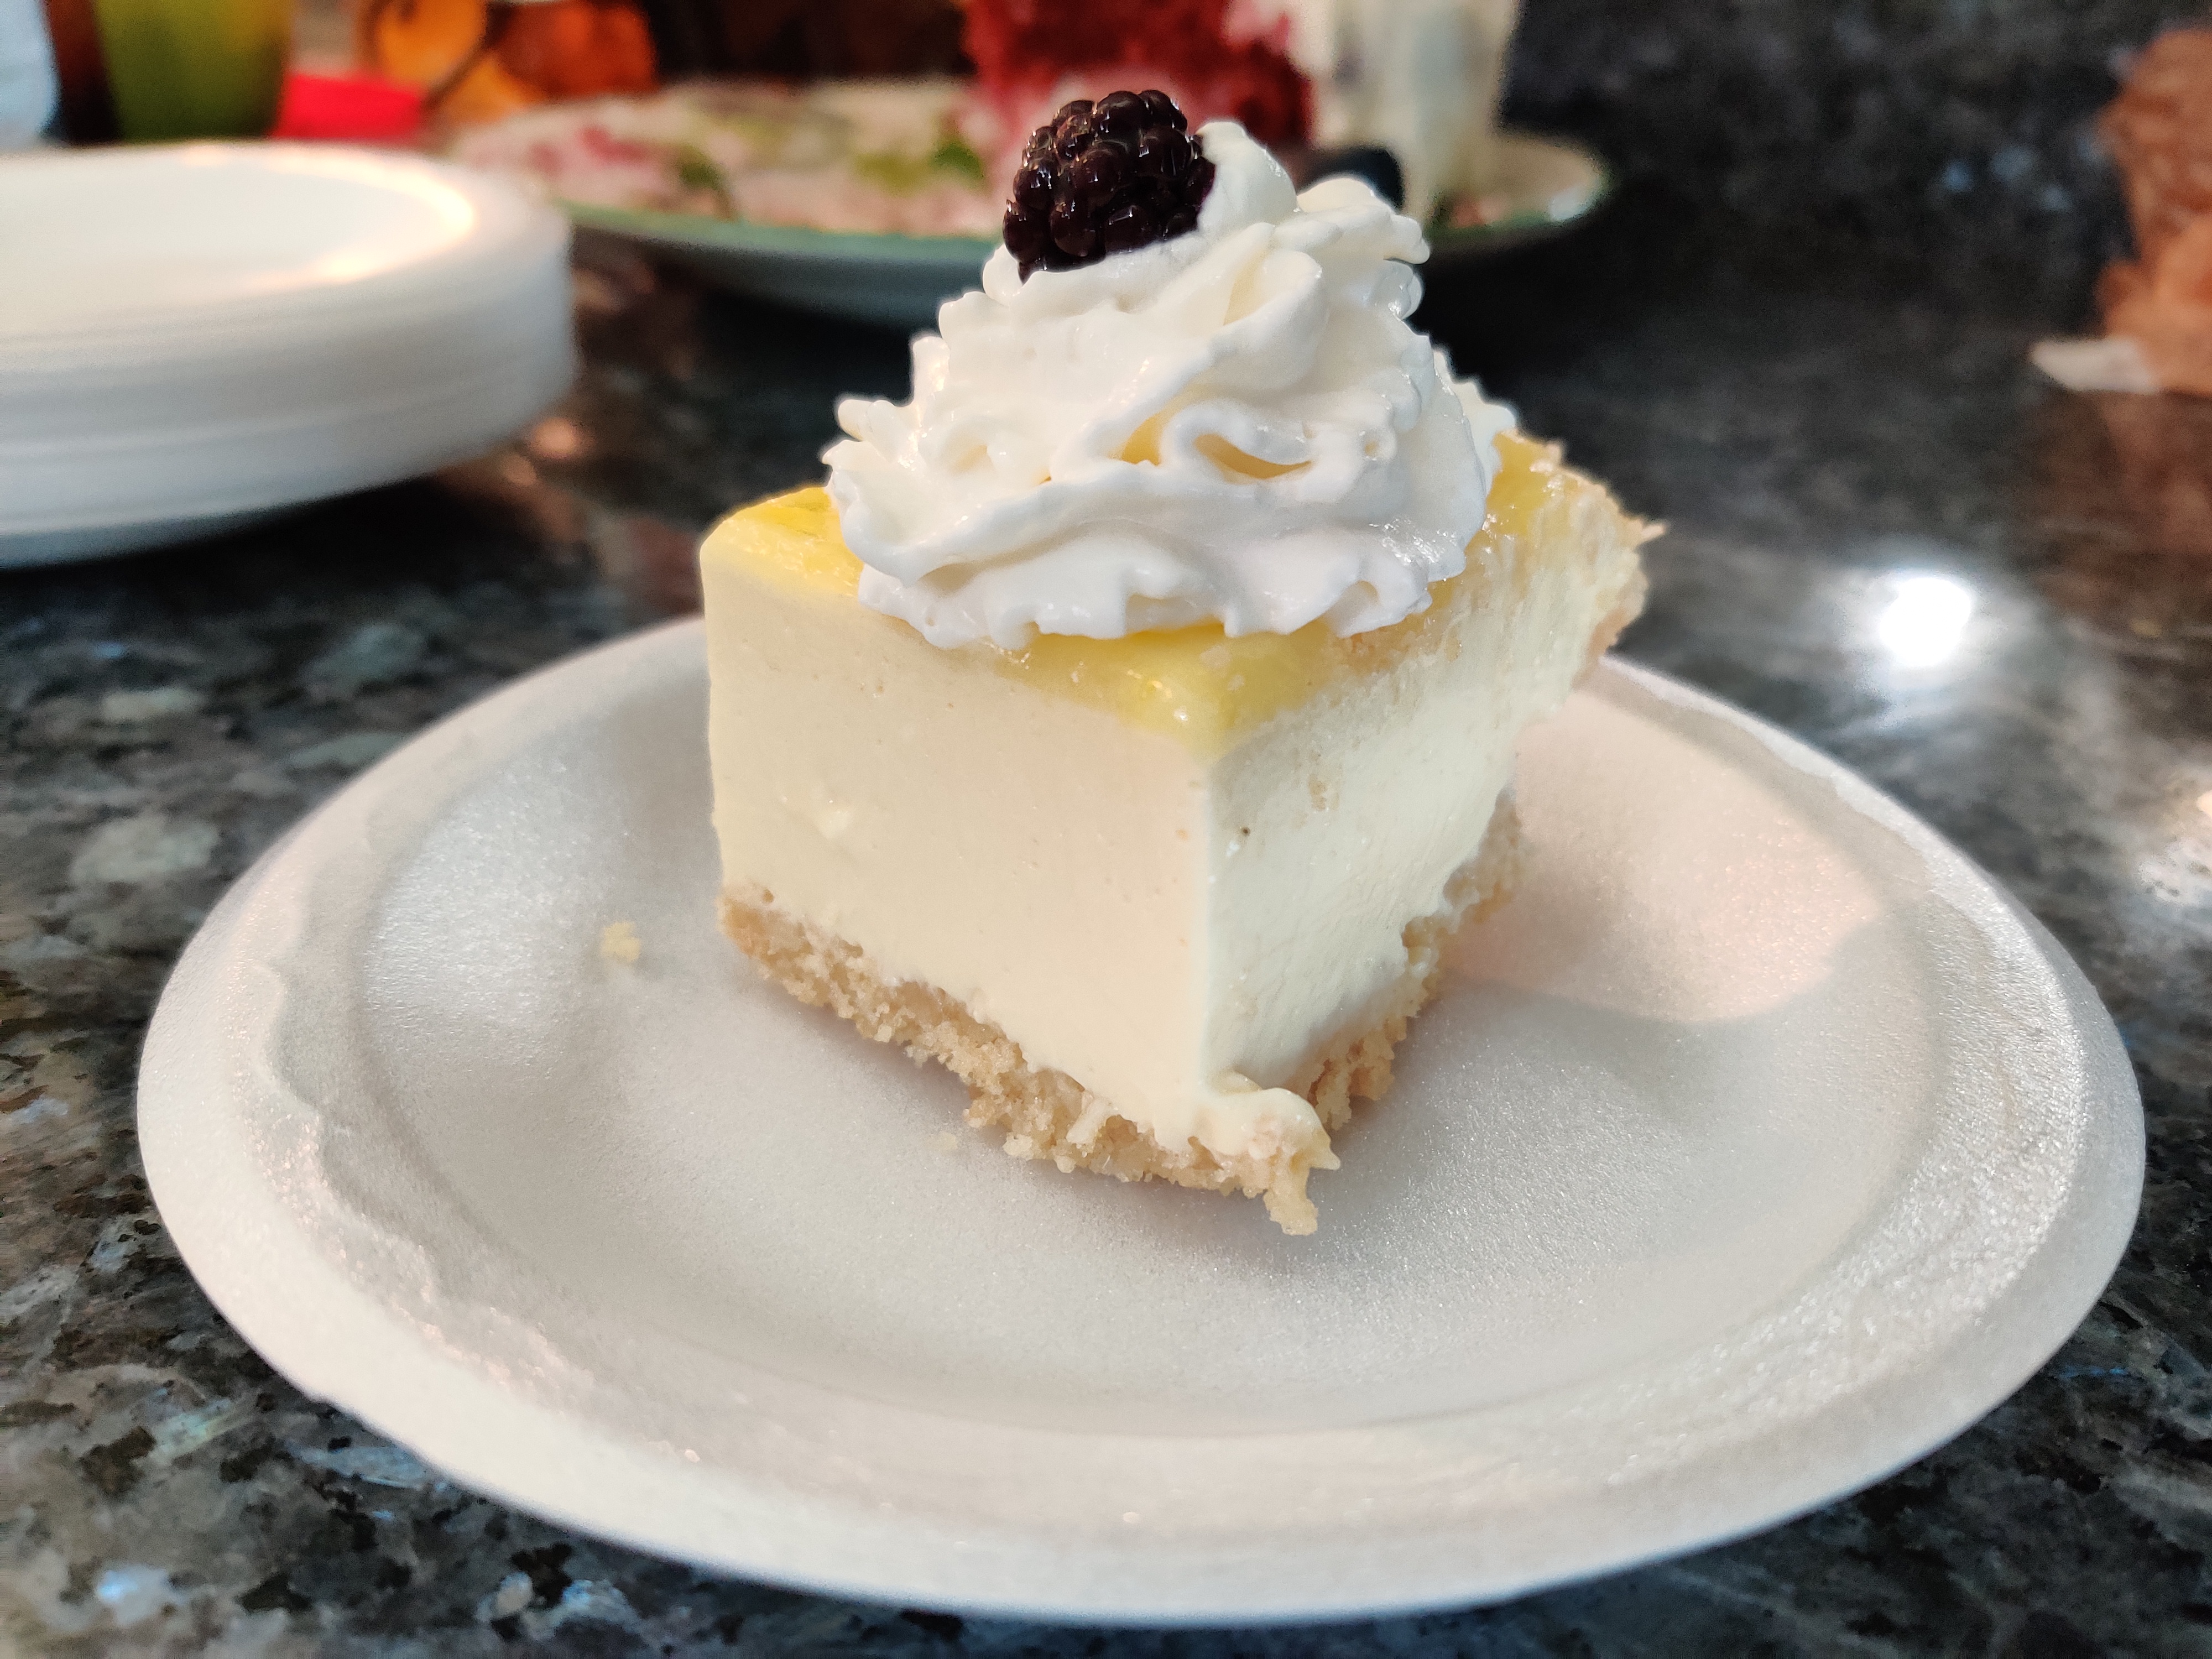
I decided to make Lemon Cheesecake Bars for my friend who loves lemon EVERYTHING. I’ve made lemon bars for him before, but I couldn’t find the recipe I used before so off to Google I went. I found a recipe for No Bake Lemon Cheesecake Bars but naturally I decided to change it up a little!
Most people love cheesecake, but it takes hours to make traditional cheesecake. A no-bake version sounded like a winner, besides being lighter and more palatable on a hot summer day. I will warn you though . . . this is one of those recipes that messes up a LOT of things in the kitchen!
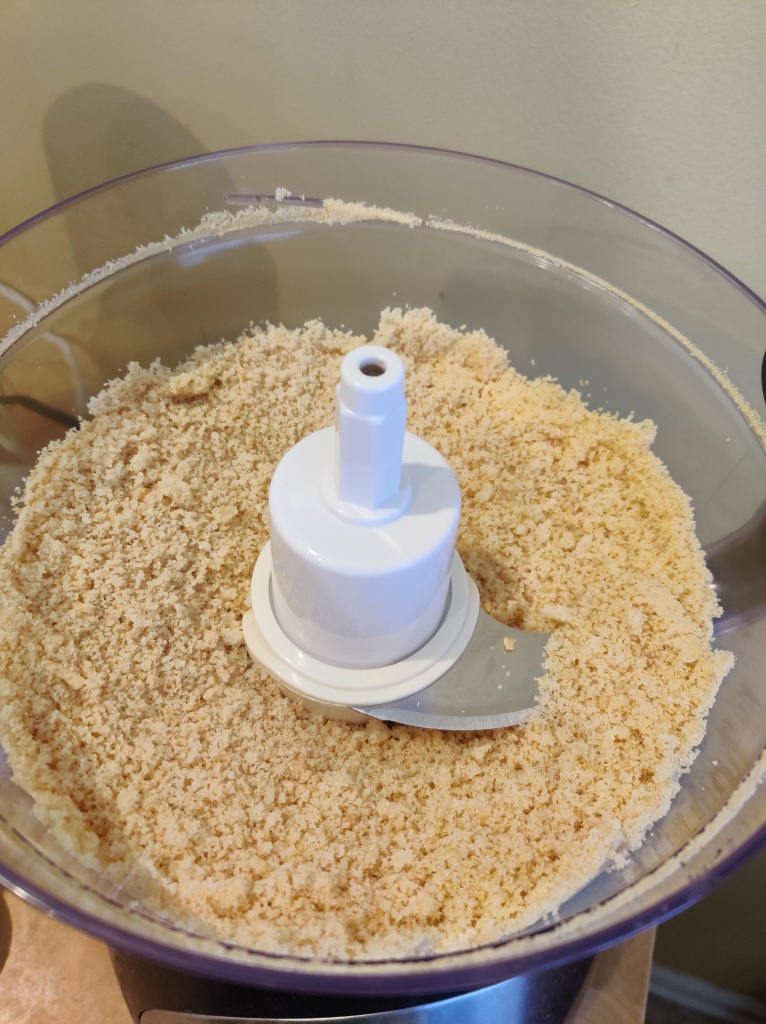
The first step is to create the crust. Most cheesecakes use a graham cracker crust, but I decided the sweetness of a sugar cookie crust would be a better balance. I intended to buy some pre-packaged sugar cookies, but there were none on the shelf. I bought a package of refrigerated sugar cookie dough instead, to cut down on my prep time. I baked them a little longer than the package instructions, so they would be crispier than usual.
This is the crumb size you are going for! If you don’t have a food processor, you and put the cookies in a ziploc bag and use a rolling pin to crush them.
Once they were cool, I put them all into my food processor and pulsed until they were medium coarse crumbs. Then I poured 1/3 c. of melted butter into the crumbs and pulsed a few more times to blend.
Prepare a 9×9 dish (or the equivalent) by lining it with plastic wrap or aluminum foil. (This will allow you to lift the bars out of the dish without disinigrating them.) You can lightly spray the wrap with cooking spray if you like. Press the cookie crumb mixture into the bottom of the dish and up the sides if it stretches that far. Put the crust into the refigerator to chill while you prepare the filling.
There are a couple of steps to complete before you can assemble the filling. First, you need to make a 3 oz. package of lemon gelatin, reducing the liquid to 1/2 cup of boiling water and 1/2 cup of iced water. Set it aside without chilling.
If you plan to use homemade whipped cream, you should prepare it now. Use 3/4 cup of heavy cream or whipping cream and beat on high until you have stiff peaks. Set aside.
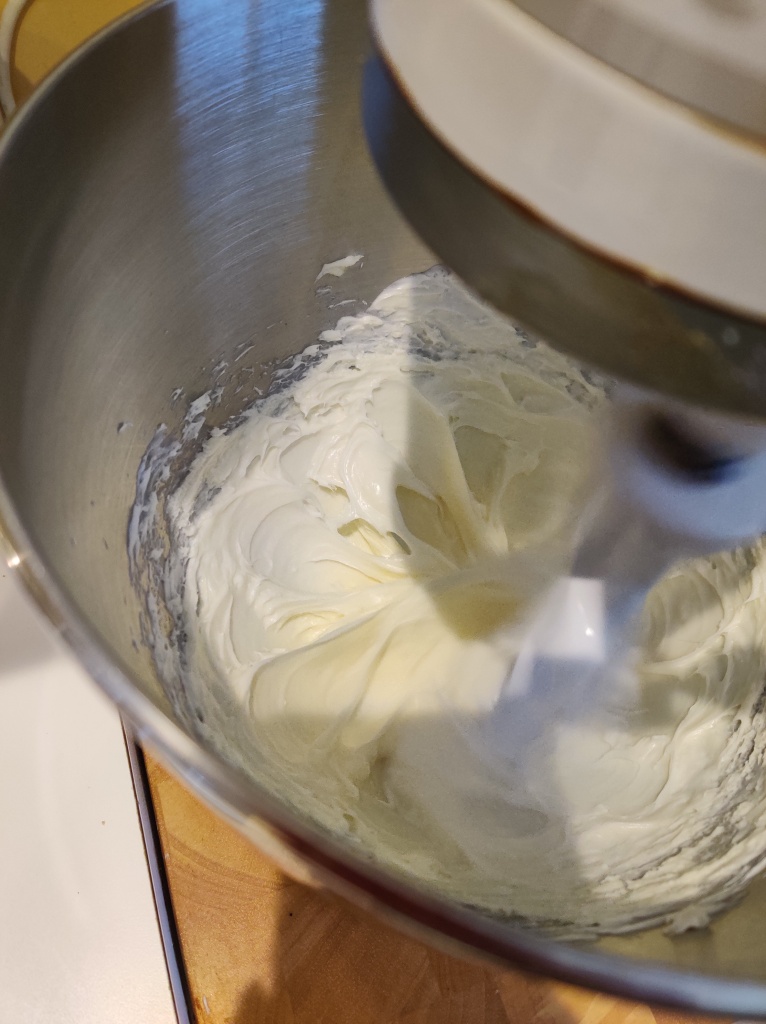
The cream cheese and sugar after whipping.
Combine 8 oz. softened cream cheese and 1/4 cup of sugar in a stand mixer, beating on medium high until it is smooth and creamy. (A hand mixer will work fine, too.) Add 1/4 cup of freshly squeezed lemon juice and continue beating. (That’s the juice of one large lemon. If it’s a little short, you can add some bottled lemon juice to top it off.) Add the gelatin mixture and continue beating. Once it is smooth, use a spatula to fold in the whipped cream. (If you use whipped cream from the grocery store, you’ll need 1 1/2 cups.)
Spread the filling in the dish over the crust and return to the refrigerator to chill for several hours (or even overnight). The filling should be firm before adding the lemon curd on top.
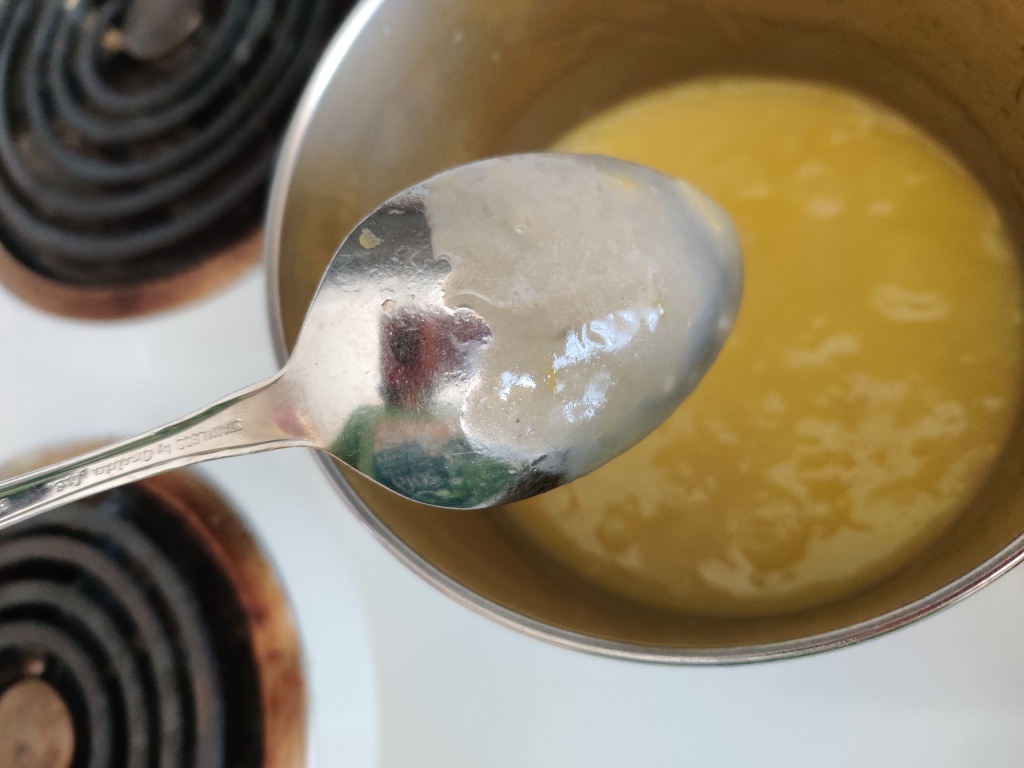
You need to make the lemon curd in enough time for it to cool to room temperature before adding it to the top.
This is how it looks when it coats the spoon.
To make the lemon curd, melt 3 tablespoons of butter in a small pan. Once it is melted, whisk in 1/3 cup of sugar, 1/3 cup of freshly squeezed lemon juice, and 1 1/2 teaspoons lemon zest. (I used two lemons — one medium and one large — for juice and still had to top it off. The medium one was enough for the zest.) In a separate bowl, slightly beat 1 egg plus 1 egg yolk, then drizzle it into the lemon mixture while whisking constantly. (Save the egg white to use in something else! I’ll be using it to make a banana pudding with meringue in a little while.) Return the mixture to medium heat and whisk constantly for about five minutes until it thickens enough to coat the back of a spoon.
If you don’t let the plastic wrap touch the curd completely, it will form a skin as it cools, which will make a big lump in the curd if you try to stir it in.
When it is ready, pour it into a bowl and put plastic wrap on top, touching the surface of the curd to prevent a film from forming. Allow it to cool to room temperature.
Once the cheesecake filling is set, you can use the plastic wrap lining to lift the entire dessert from the pan and onto a surface to cut it into bars. Spread the cooled lemon curd on top. Top with more whipped cream and maybe fresh berries to garnish.
If there are any leftovers, keep them in the refrigerator in an airtight bowl. (But I’m betting there won’t be any!)
UPDATE: Because there wasn’t a large crowd on Labor Day, I did have leftovers in my fridge for 5 days and it held up beautifully! The crust wasn’t soggy and the filling was still moist but firm.
For the past two years, I’ve been trying to work on an updated, revised edition of my cookbook, A Week with the Fake Gourmet. Life has been even more hectic and busy than ever, so “trying” all too often meant “avoiding.” But I’ve decided that it is time to stop procrastinating and get this project DONE!
What does that mean to YOU exactly? Maybe nothing. But it means a lot to me.
First, I hope that telling my secret will make me accountable for getting finished. I’m setting a goal for November so it is ready to publish before people begin Christmas shopping (and cooking!).
Second, it means that I have to start doing more cooking than I have been doing lately. I plan to include lots more photos in the new edition, which means cooking all those recipes and taking pictures while I am doing it! (Pictures are the hardest for me. I take my own and that’s hard to do when your hands are up to the elbows in food.)
Finally, it means I have to keep this blog updated more often. I had no idea it had been 5 YEARS since I posted anything! Now that all of my kids are out of the house, I don’t do as much cooking just for me and my mom. We have very different tastes in food and she doesn’t eat as much as most third graders, so quantity and variety are both issues. Our Sunday Night Dinner group is not as big as it used to be and we often rely on easy over inventive. Add the lack of social interaction due to Covid-19, and it all adds up to less time in the kitchen.
So it’s time to stop making excuses and get cooking! I hope you are willing to come along for the ride.
Yesterday (Labor Day) was a perfect day at the lake. Boat rides, tubing, swimming, sunning, and EATING!
It was a big group, so we all brought something to share. Spending three hours making bread didn’t really appeal, but since no one else was bringing bread so I thought I probably should. I remembered seeing a 3-ingredient bread on Pinterest that required no rising and no kneading. This could be the perfect time to try it! After all, this group always has a few willing guinea pigs for a new recipe.
I finally found it at The Gingham Apron and realized I could get this knocked out, start to finish, in an hour!
Turned out pretty, no?
So easy, too! First, in a medium-sized bowl, stir together 3 cups of self-rising flour and 1 cup of sugar. Once they are blended together, add one can (12 oz.) of 7 Up and stir until a soft dough forms and all the flour is worked in. (Be sure to check the center at the bottom of the bowl.) Pour the dough into a greased loaf pan and bake at 350 degrees for 50 minutes. That’s it!
I greased my pan with butter (of course) and then brushed a little more melted butter over the top of the loaf as soon as it came out of the oven. It was probably less than a tablespoon of butter total.
Use a knife to loosen the bread from the sides of the pan and then turn it out to cool on a wire rack as soon as you finish buttering the top.
This bread is very cakelike inside and crusty outside. When I make it again, I may reduce the cooking time by 5 minutes, just to make it easier to slice without destroying the pieces. I may also reduce the amount of sugar a bit for the benefit of my diet! (If you use diet 7-UP, that would also reduce the sugar. Let me know if you try that!)
Now, just to make you a little more envious of the perfect, relaxing day we had yesterday, I will close with this:
You know how bread smells when you get to the end of the loaf and you know that it is just about to go bad? That overly sweet, cloying smell? The smell that comes right before the bloom of mold?
That’s what our bread smelled like when I opened it yesterday to make myself a sandwich. Yuck. Straight to the garbage for that loaf.
So this morning when I got up, I decided that it would be a good day to make some bread, just for us. I got busy and got the ingredients for egg bread in the bread machine first thing. (Call me a cheater if you want, but I can’t live without my bread machine!)
I did all the usual things to turn out a couple of loaves of beautiful bread . . .
olive oil to grease the bread pans . . .
This is about how much olive oil it takes to grease one pan.
shaping the loaves ( I really prefer to bake the loaves myself instead of in the machine. They are just prettier that way.) . . .
Be sure to coat the dough by turning it through the olive oil when you put it in the pan.
letting the dough rise in a slightly warmed oven . . .
I let the oven preheat to 150-200 while I am shaping the loaves.
After about 40 minutes, the loaves are ready to bake!
. . . until it was nicely doubled.
Two beautiful loaves cooling
And finally, perfection! Two beautiful loaves of homemade bread just in time for lunch!
It got interesting, though, when I decided to make a sandwich out of my fresh-baked bread.
I raided the fridge for some meat and cheese. I had a few pieces of Pesto Parmesan Ham and some smoked provolone that I thought would make an excellent grilled cheese.
Then I saw the jar of apple butter. (Also homemade, but not by me. It is the last jar of the last batch my mom made.) Hmmm…apples and ham are good together, so why not try them together on the sandwich?
I’m sure this isn’t the first time someone has combined these things, but it’s the first time it occurred to me. So I did it. Definitely a good decision! The hint of sweetness from the apple butter was divine combined with the savory of the pesto on the ham. And of course, the melty-goodness of the cheese was pretty awesome, too!
Grilled pesto parmesan ham with smoked provolone and apple butter on fresh-baked bread
Lesson for the day: don’t be afraid to put things together that you never thought of before. Chances are if it sounds good, it will be good!